

Starting a website could seem like a complicated process since there are a lot of steps involved in this process.
You might be worried about all the elements involved, like web development, designing and coding.
But I have good news for you.
It’s 2024 and with the availability of so many tools and resources on the internet, creating a website is so easy that you could practically do it within an hour.
There are a lot of advantages to making your own website than what you could possibly imagine.
By creating a website of your own, you can connect with an audience of like-minded people around the globe.
Not only do your ideas or methods reach out to a wide number of people, but you can actually monetize your website as well and be self-employed like that of thousands of website owners.
Creating a new website is a great decision towards creating your own something that could make you self-sufficient and financially independent as well (if that’s your goal).
Some of the common benefits of making a website are:
Giving your passion a platform – I have seen a lot of bloggers writing book reviews, food reviews or sharing their views on topics like politics, healthcare, technology and a lot more. A lot of websites are also dedicated to the same purposes and I think this is one of the best things about building a website that your views and passion get a voice and a platform.
Promote your business – A lot of businesses can also start their own website, create an online presence and get more customers to get more sales.
Website guides – Sites like ours that aim to teach other people about certain topics are also a common example of websites. You get to share your knowledge with people across the internet and teach them the skills you have.
Creating Jobs – When you create a website of your own, you are potentially showcasing your skills and talent to a wide audience. This audience could also consist of employers from top-tier companies that might be interested in your work and could ask you to come on board.
Making money – About 90% of websites are meant to make money by offering their services or products. You can even make money through ads, affiliate marketing, promoting products etc.
Making a website is a great idea. However, with all the different kinds of guides available on the internet, it’s not a surprise if you reach dead ends since most of them are not explained well.
As such, I tried to keep this guide very simple, self-explanatory suitable for all ages and perfect for starting all kinds of websites.
Before we go through this thorough guide, make sure to arrange the following things that we are going to use in this website creation process:
- Decide a name for your domain.
- Your credit/debit card to buy the domain.
- At least an hour of your time.
To build a fully functional site of your own, you would have to choose among a variety of blogging platforms available.
To save your time on researching about the same topic, we would be settling with WordPress over other platforms, because:
- You have a 100% control over your website.
- There are thousands of free and paid plugins to customize your site.
- It is easy to use and navigate the dashboard.
- WordPress is SEO-friendly. The control over URLs and the ability to customize them gives you a benefit while ranking for different keywords.
- It could be used to build all kinds of websites, online stores and forums.
- WordPress powers 35% of the websites in the world
With this said, let’s start sailing on our journey of ‘how to create a website’ and build an amazing website for you in a matter of a couple of hours.
I have divided this guide into 3 stages: Domaining, Hosting and Starting a Website. All these stages have sub-categories that you don’t want to miss.
Note: If you want a free domain or buy a domain and hosting together, go to stage 2 directly.
STAGE 1: DOMAINING
Buying a domain is the primary step for making a website.
So, you might ask, ‘Why should I spend money to buy a domain when I can get a subdomain for free?’
It’s true that most of the blogging platforms allow you to host a site for free, under a subdomain. But that’s not the wise choice because:
- Subdomains are usually considered to be incomplete websites and aren’t a very ideal choice if you want your website to be professional.
- They aren’t good for SEO purposes.
- Your website could shut down if the hosting platform decides to shut down.
- Subdomains are usually insecure.
- You don’t have full control over your website.
While I don’t recommend settling for a subdomain, I sure don’t entirely reject it as well. Subdomains have their own use and benefits depending on the type of website you want.
However, we are here to build a new website for you, so we would go on with that.
Step 1: Head over to any of the domain registrars you prefer.
In our case, we would be using GoDaddy because the domains are usually low priced and you are likely to find better options here.
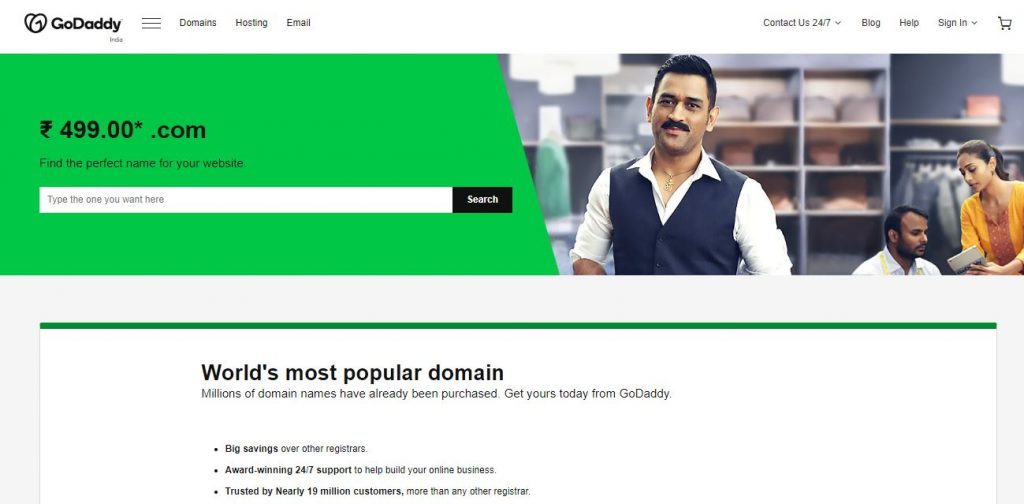
Step 2: Next, we will search for the domain name of our choice.
You can enter the domain name of your choice and check if it’s available.
In our case, let’s try finding the domain name ‘kyndaily’, which means ‘Know Your News Daily’.
Tip: If you are confused about choosing a new blog name, check our list of the blog name generators and try choosing one from there.
Step 3: So, we enter ‘kyndaily’ in the domain field and voila! The domain is available and that too with the .com extension.
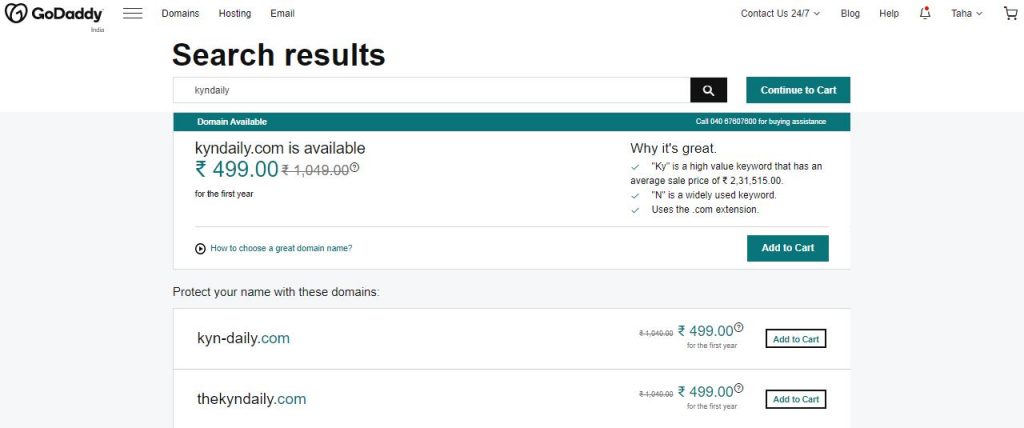
Step 4: Next, we will be adding our site to the cart. To do that, simply click on ‘Add to cart’ button and you will be forwarded to the next page.
Step 5: As we move forward, we are sent to the payment and review page where can finalize the price of our domain.
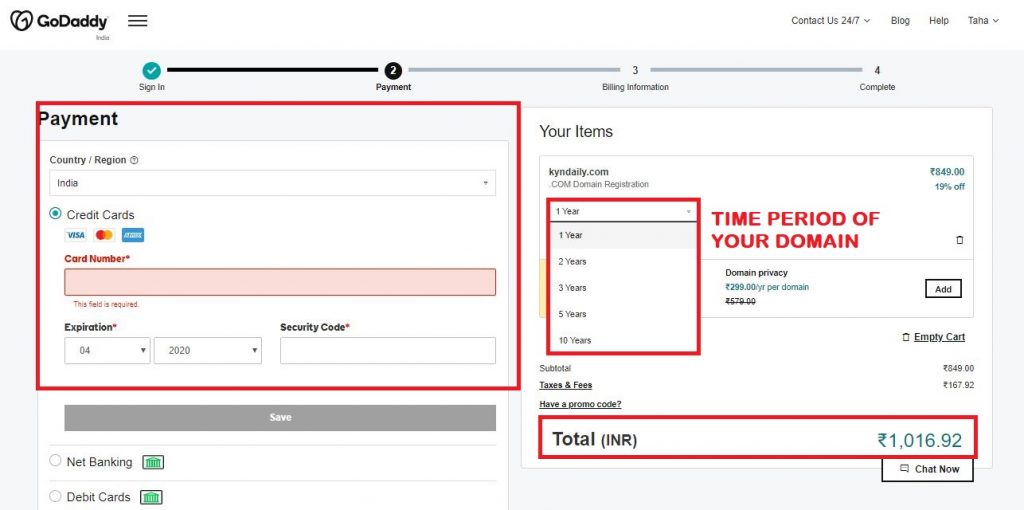
Here, you can choose for how long you need a domain for.
Then, you can also choose if you want to buy domain privacy or not. If you want a reasonable answer, I suggest you throw in the domain privacy option as well if you don’t want your domain registration information to be public. Plus, it’s only a fraction of the total cost.
You can also choose if you want a matching domain as well or not. Usually, for individuals, it isn’t necessary, but if you are a business, you can add them as well.

Step 6: Then, all you have to do is to fill your payment details. Depending on your region, you can complete your payment through the following methods:
- Net Banking
- Credit Card
- Debit Card
- Wallets
- UPI
Step 7: Now, after you complete your payment, you would be given your billing information and that’s it. You have bought your domain.
To manage your domain, click on your profile on the top right corner and click on ‘Manage Domains’.
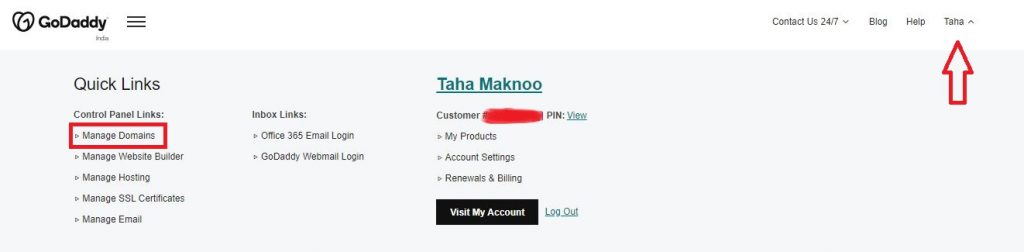
You have purchased your domain. Let’s keep it safe and move on to the next stage, Hosting.
STAGE 2: HOSTING
Web hosting is one of the most important things for your website. If you don’t know what hosting is, let me explain it to you.
Hosting is exactly what it sounds like.
As you are creating your own website, you are also creating files for that website. On top of that, these files need to be stored somewhere on the internet.
That’s when your hosting provider comes into the picture.
When you choose a hosting plan, you are hosting the files of your website on one of these servers and you are charged monthly or annually.
Hosting providers have a bunch of servers globally that make your site live in every part of the world.
A common hosting provider has the following features:
- Adequate security measures for your website.
- Keeping your website live 24 x 7.
- Handling a specific amount of traffic at a time (depends on the hosting plan you choose).
- Speeding up your site.
- Frequent website backups.
- Proper support for customers.
Types of Web Hosting
Web hosting could also be of different types depending upon your priority.
I mean your new website and sites like Domain.com or Microsoft won’t have the same type of hosting plan, right?
So, let’s understand the different types of hosting plans (in brief) that you could settle for before we choose a hosting plan.

Shared Hosting – Perfect for new websites and beginners where websites share the same server resources like RAM and CPU. Could handle some amount of traffic at a time.
VPS Hosting – Perfect for website owners who need more control to their site without necessarily asking for a dedicated hosting server. Can handle a good amount of traffic.
Dedicated Server Hosting – Full control is given to the website owners because an exclusive server is dedicated for your website. It could handle an enormous amount of traffic. Perfect for e-commerce sites or sites that have a lot of traffic as they are pretty expensive as well.
Cloud Hosting – It’s a new hosting solution that works through a network and enables the companies to consume the computing resources. Downtime rarely occurs and is perfect for sites that plan to expand with time.
My Verdict
With these different kinds of hosting plans, it’s fairly obvious to choose a standard shared hosting plan. The reason is that it’s perfect for beginners, usually affordable and is going to handle enough traffic a site gets in its beginning stage.
With time, you can move to another plan as per your need.
I hope that now you are pretty sure about how important website hosting really is. With that cleared, let’s pick a hosting provider for you.
There are a bunch of hosting providers that promise the features a website owner needs (typically the ones I mentioned above).
However, here’s an honest opinion – Not all of them are as good as they seem.
Your prime concern might be the price. However, keep the fact in mind that cheap hosting services don’t last long.
They might seem pretty fast at first or perform really well within a very less price. But as your website progresses, more visitors come through and more content is featured on your site, you might notice frequent server crashes or underperformance of your website.
‘So, what would be the most ideal option for me?’ you might ask!
Well, if a great hosting provider and an affordable plan is something that you are looking for, I recommend BlueHost.
Since 2005, BlueHost has been providing constant support for WordPress and there’s absolutely no reason to not try it out.
Not only does it have amazing and affordable plans, but you also get dedicated hosting plans for different types of websites.

Here are some of the most outstanding features of BlueHost that make your website one of the best in its job:
- Affordable.
- Dedicated support for WordPress.
- One-click-install for WordPress.
- 24 x 7 support.
- Easy to set up and use.
- One of the fastest hosting providers.
- Different types of hosting plans.
Buying a domain and then connecting it to a host could be a bit of a complex job. However, BlueHost eliminates this factor completely.
Bluehost is one of the best hosting services out there. But why exactly am I recommending BlueHost as a beginner?
Along with all the features it provides, the best part is that you also get a domain for FREE!
This means you don’t have to buy a separate domain at all.
And if you want to save about 60% on purchasing a hosting plan, our affiliate link is going to provide a 60% discount on your purchase. Just a little commission for us and extra savings for you. Click the banner below to claim your deal or just click here.

However, if you want to try more options, you can also check out:
- A2 Hosting.
- Cloudflare.
- Hostgator.
- Hostinger
- DreamHost.
Moving on, let’s buy a hosting plan!
Buy a hosting plan
Step 1: Go to Bluehost and click on the ‘Get Started’ button.

Step 2: You will be sent to the pricing page where you have to choose a plan for yourself.
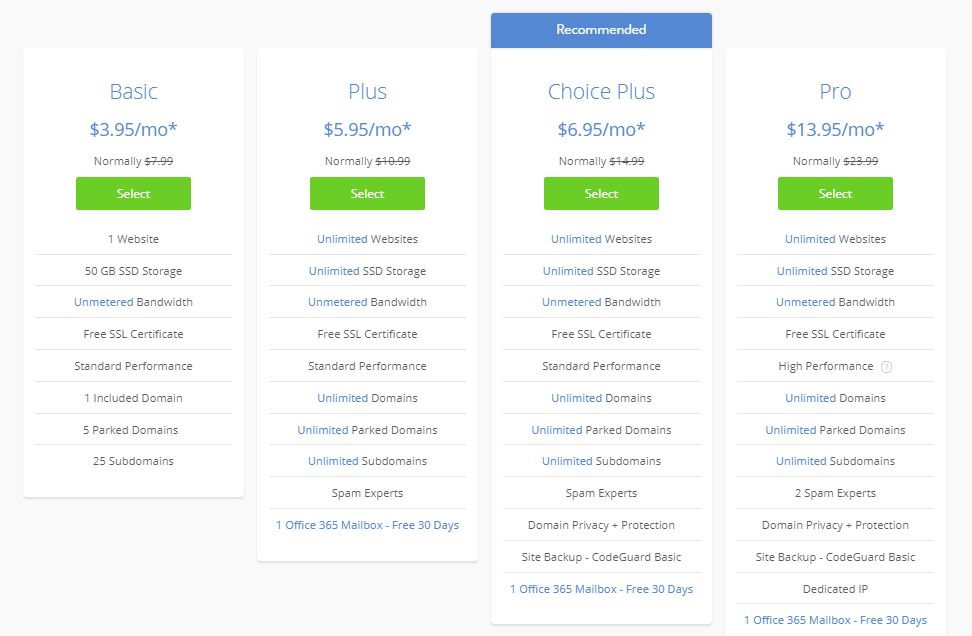
Out of the different plans available here, I recommend you go for the basic one. Because it can host one domain easily along with giving you the free SSL certificate.
This is more than enough for somebody who’s just getting started in making a website.
Step 3: So, choose the basic plan and click on ‘Select’.
Step 4: Next, you’ll be asked to either ‘create a new domain’ or ‘Use a domain you own’.
If you already purchased a domain from Stage 1, then you can use that domain. However, if you haven’t made the purchase yet, you can claim the free domain in this step.
Step 5: After you choose either of the two options from step 4, you will be sent to the next page where you can review your purchase.
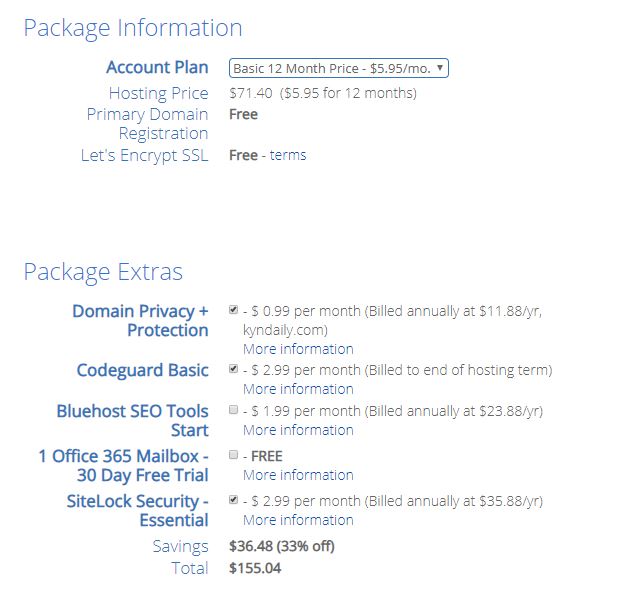
Step 6: Add the payment information on the same page. Complete the purchase and voila! You purchased your hosting plan.

Step 7: Now, you will receive an email that will give you access to your web hosting control panel (cPanel).
Now we have our hosting plan. Also, our website is connected to our hosting plan as well.
Let’s start developing our website.
Stage 3: Start A Website
We would start by installing your WordPress website on BlueHost.
I dedicated three sections to this guide.
Section #1 – Installing WordPress website on BlueHost
Step 1: Start by logging into your BlueHost account.
Step 2: Now, click on ‘My Sites’ and then on ‘Create Site’.

Step 3: Fill the details of your site. In the next few seconds, WordPress would start installing on Autopilot.

Step 4: After the setup is done, you will get the login details (the username and the password). Keep these details safe somewhere as these are your credentials to log in to your WordPress dashboard every time.
This is how the login page looks like:

Remember:
- You would also be given a WordPress admin link that would allow you to log in to your WordPress dashboard.
- It would look something like ‘yoursitename.com/wp-admin’
- Bookmark this site.
- Even WordPress suggests you bookmark this link so that you reach your WordPress dashboard fast.
Verifying SSL/HTTPS
An SSL certificate delivers your website securely to your audience. The best part about ‘most of the hosting platforms’ like Bluehost is that it automatically adds an SSL as you install WordPress on your site.
To check the status of your SSL certificate, follow these steps:
- Login to Bluehost and click on ‘My Sites’.
- Find your site and click on the option of ‘Manage Site’.
- Now, go to the ‘Security’ tab.
- On the same page, you will find ‘Free SSL Certificate’ status.
After you follow these steps, you would see a lock icon next to your domain name in the web browser.

Note: In case you don’t find the SSL certificate set up just yet, wait for a few hours to get updated. Don’t worry as it usually takes some time.
In the meantime, you can still continue building your website, so let’s continue doing that.
Section #2- Testing your new WordPress site
Now, as your website is created, let’s log in the dashboard and test its working.
Head over to your site by entering the URL in your browser.
In our case, the name of our site is ‘Kyndaily’. So, we will enter kyndaily.com in the web address.
And it brings us to our homepage, which we haven’t built yet of course.

If your page looks something like this, then your website is successfully connected and you can now start posting content on it.
It doesn’t look that attractive, but we will change it soon, don’t worry!
Now as all these things are done, let change the design and theme of your site to make it look good.
Section #3: Customizing your site and adding content
The hardest part of your site setup is complete, trust me. Now comes the easy YET IMPORTANT part – the design.
Your site is just another website on the internet if it doesn’t have a proper design.
A site identity is reflected in its design and how it is presented. Whatever you plan to do on your site should be clear to the viewer as soon as he enters your website.
Now as we have a WordPress website, the visual appearance is controlled by WordPress themes.
One of the best things about these themes is that they are professionally designed, give a beautiful look to your site and are customizable as well.
Not only can you pick from a variety of default designs and themes available at WordPress, but you can also purchase/download new themes and activate them on your site.
For now, let’s try applying a theme on your website, other than the one it already has.
Step 1: First of all, let’s go to the dashboard of your site.
To go to the dashboard of your site, you can either log in with your credentials; or if you are already logged in, click on the site name on the top left corner and click on dashboard.

Step 2: Head over the ‘Appearance’ of your site and click on ‘Themes’.

Step 3: Next, there would be a few themes already present in your database. One of those themes might already be active, so we will try to activate some other theme.

In this case, let’s try to activate the second theme i.e. ‘Twenty Nineteen’.
Step 4: To activate the theme, simply bring your mouse over it and click on ‘Activate’.

As soon as you activate the theme, you would get the message ‘Theme Activated’.
Just head to the website and you will see that your website has a new theme now.

Okay so, that’s it. Maybe this theme might be okay for starters, but I am sure you’d want to try out new themes.
So, let’s try installing a new theme.
Installing a new theme on your site
Step 1: Just like the first two steps above, reach the Themes page in your WordPress dashboard.
Step 2: Click on the ‘Add New’ button on the top of your page.

As you reach the next page, you are going to find a lot of new themes that are provided by WordPress for FREE. Along with that, they are also professionally made, so I am pretty sure you’re going to fall for at least one of them.

Step 3: Just like in our previous section, follow the same steps. However, instead of ‘Activate’, the option now would be to install the themes.
Bring your mouse pointer to any of the themes you like and click on ‘Install’.
Note: Before you activate a theme, if you want to see how it looks like, you can click on ‘Preview’ which is right next to the ‘Install’ button. This will help you to see how the theme would look on your site.
Step 4: After you install the theme, just click on ‘Activate’ again and voila! Your new theme is now live.
Head over to your site in order to see the changes.

So we are done with activating a new theme.
But there are chances you might be looking to install a new theme of your choice that you may not fight in the list of themes in WordPress.
Uploading a new theme
There are thousands of free and paid WordPress themes on the internet that you can install on your site.
This is the beauty of WordPress that it is fully customizable.
Let’s upload a theme of our own.
Start with going heading over to themes of your site.
Step 1: Go to the official page of WordPress themes and download a theme of your choice.
We would be downloading ‘Hello Elementor’ because it’s one of the best themes of 2024.
Step 2: Download the theme.

The theme would be saved in your computer.
Step 3: Go to Appearance > Themes > Add New.
Step 4: Click on ‘Upload Theme’.

Step 5: Choose the file from your directory and click on ‘Install now’.

Step 6: After the installation is over, click on ‘Activate’. That’s it.

Now, you can visit your site and see the new theme applied.
You can also customize your site by going to your Dashboard > Appearance > Customize and add new features easily.

I guess you are clear enough about how to install a theme, how to customize your theme and add new content as well.
Let’s move ahead and help you add content to your website.
Adding content to your site
Posts and pages are one of the most important elements of a website that help you with adding more information to your website and diverting your audience to your products, services or blogs in general.
WordPress, like every other content platforms, allows you to add posts and pages.
Just like we post content on dothacks and have pages for particular entries, the same goes every website owner.

Simply explain, posts on your website keep on appearing in reverse chronological order as you push out more and more content.
These posts are the main attraction of a blog and a part of such types of websites that offer products or services. By default, these posts are shown on the homepage of your WordPress website. That doesn’t mean you can’t change them.
You can make a separate page for the posts of your website and keep them for a specific page under a name like ‘Blog’ or anything you like.
Pages, on the other hand, are static elements of your website that are used for references or knowing more about your sites. Pages could include ‘Privacy Policy, Contact us pages, Disclaimer’, etc.
So, let’s try making a post and a page.
We would be starting off with writing a post, so let’s start with that only.
Writing a Post
Step 1: Go to the dashboard of your website and click on ‘Add new’ under ‘Posts’.

Step 2: You will be sent to the page where you can start writing your first blog post. So, let’s write something.

Step 3: After you are done writing, you can click on ‘Preview’ at the top right corner to see how your post looks like. If it’s exactly how you want it, click on ‘Publish’ that you can find right next to the Preview button.
Note: On the right-hand side, there are a bunch of options that you could use to modify your blog post and make it the way you want.

After you have published your post, you can check it out.
Step 4: Go to your website and see the published post. If any changes are needed, just click on the ‘Edit’ option that you can find in the same place – Dashboard > Posts > All posts. Or you could just click on ‘Edit’ in the same post.

That’s it. Your first blog post is live and ready.
Adding a page
Adding a page is pretty similar to that of adding a post.
All you have to do is to head over to your WordPress dashboard > Pages > Add New.
Just add a title like a blog post and write your content. Publish it. That’s all.
Customizing your site
Before we wrap up, let us tell you some of the most important things that you might want to change in your site, like changing the title, adding menus or starting a comment section. Let’s do that, shall we?
Changing the site title
One of the most primary things is to change the title of your site because that’s the main element of your site identity, right?
Here’s how you do that:
Head over to your dashboard > Settings > General.

Out of all these options, you can change them accordingly.
All of them are exactly what they sound like.
The title of the site is what you prefer it to be. Usually, it’s the same as your domain.
Another thing is the tagline, that describes your site in a few catchy words. It’s more like a branding line for your site, so you might want to be picky with it.
Don’t forget to click on ‘Save’ after you are done with setting the title and other things.
Adding a comment section
Comments are another important element that contributes to a complete website. Comments allow your audience to connect with you and ask you questions or suggestions based on your content.
As such, we would now be adding comments on your new website.
Head over to your dashboard > Settings > Discussion.

You can change the settings as per your will and preference.
However, I do recommend that you tick the option of manually approving comments or you might see a lot of spam comments and links in your comment box in the future.
Creating menus for your website
Menus are on the header of your site. These menus can help a user to explore pages or posts.
They are like navigation for your users to reach different sections of your website and explore particular content.
WordPress allows you to make beautiful menus and customize them heavily.

Head over to your dashboard > Appearance > Menus.
By default, the menu is empty.

Click on ‘Create Menu’ followed by naming the menu.

You can add new pages in this menu. I added ‘Home’ and ‘Sample Page’, but you can even add ‘Privacy Policy’, ‘About us’, ‘Our Services’ etc. like categories.
The best part is that you can even drag and drop the position of these menus with your mouse pointer as per your need. You can even create sub-menus by dragging-and-dropping a menu and placing under another menu.
For the display location, you can choose to show the at the header (because that’s where menus usually are). You can make a new menu for your footer section as well. No harm in trying out new things.
If you want to keep your menu at the top, make sure you tick the ‘Primary’ menu button.
Also, don’t forget to save your menus after you make them.
Before we finish, there’s one more thing that your website needs – PLUGINS.
Installing a Plugin
Plugins are like apps on a smartphone. They allow you to do different things you want your smartphone to do.
So is the case in WordPress.
One of the things I love about WordPress is that there are thousands of plugins for all kinds of things you’d want to do with your site.
There are about 50,000 free plugins in WordPress.
However, out of these plugins, there are a few important ones that almost every WordPress website owner uses.
Let me tell you about them.
Note: Before you start installing plugins left and right, know that plugins could also increase the loading time of your site, thus making it slower. I recommend downloading only such plugins that are important and top-notch, somewhat like the ones mentioned below.
- Yoast SEO – The best free plugin for Search Engine Optimization (SEO).
- A2 Fixed W3 Total Cache – Serves cached pages and increase the site speed overall.
- WPForms Lite – Helps you to make a contact form for your website.
- TinyMCE Advanced – A classic WordPress editor that gives you more features while writing content and find the best Google fonts.
- Sucuri – Performs malware checks on your website.
- Site Kit by Google – Helps you integrate Search Console, Google Analytics and Google Adsense into your website, all in a single plugin.
Talking about installing a plugin, it’s easier than ever with WordPress.
Head over to your website dashboard > Themes > Add New.

You’ll find a bunch of plugins that you could try. Whatever plugin you want to install, just search for it in the search box in the top right and click on ‘Install now’.
You can also add a new plugin from your directory by clicking on ‘Upload New’ and choosing the .zip file from your computer.
Frequently Asked Questions (FAQs)
Q. How much does it cost to make a website?
Making a website is an affordable option usually. However, it still depends on the type of website you want to build.
If you want a simple website that would usually feature blog posts and have a few products for sale, with the help of a few plugins and extra features, you can do it.
But if you want an e-commerce website that aims at a more professional design and features, it might cost you more.
A normal website would usually cost $10-$20 a month.
Q. Can I start a website for free?
Certainly, yes!
However, there are a few problems with a free website that you would face in the long run.
Website builders can offer free websites. But the heavy promotion they display as their banners or advertisements on your site could look very unprofessional.
As such, I recommend you rather purchase a website than rely on the free ones.
Q. I don’t know anything about coding, CSS or any other programming languages. Can I still make a website?
Gone are the times when you would have to learn any programming languages for building a website.
With the help of different tools and abilities of WordPress, you can develop and design a website without knowing anything about coding.
Q. Can I build my website on any other platform other than WordPress?
There are different website building platforms that you could try other than WordPress. However, WordPress is the easiest and most beginner-friendly website platforms that you can find.
Other alternatives include Drupal, Joomla, Weebly etc.
Q. Can I use HTML in WordPress?
Of course. WordPress is totally customizable and you can even add different HTML elements in your website to add manual content or code.
Q. How can I earn from my website?
You can earn money in many ways on your website.
Some of the common methods are displaying ads, affiliate marketing, promoting products, promoting other websites etc.
If you want some other ways to earn money online, you can also check out our list of the top micro jobs sites.
Q. I already have a website. Can I redirect all its pages to a new domain?
You can easily migrate from one site to another and install WordPress without any hesitation. Check out our guide on redirecting all pages to a new domain.
Q. I have followed through every step of the guide. Is there anything else that I have to do?
If you have properly followed the guide, you would already know what to do next and how to build other elements on your website.
However, I do recommend that you check out this website launch checklist 2024 before you finalize your website and its design.
CONCLUSION
I guess this guide was sufficient to make you understand how you can make a website in 2024.
I hope all the instructions were clear and that you understood everything clearly.
In case you have any queries, doubts or suggestions, feel free to mention them in the comments and I would be answering you soon.
Also, you can follow us on Instagram, Facebook and Twitter and join our community to be updated with all the news tips that you would find just there.